
It happens to all of us. You plug your SD card into your Mac, open the Finder window and… no photos. If you’ve found yourself in such a position, especially after an important shoot, you know exactly how frustrating it can be. But here’s some good news for you — in 99% of such cases, your photos are not lost at all. Your SD card simply does not work properly when connected to the Mac and your Finder does not recognize your photos. And in case when even these simple tips do not help you, professional solutions like Stellar Photo Recovery are always ready to assist.
Let’s see what exactly might cause the issue.
Why your SD Card Isn’t Showing Photos
Before jumping into fixes, it helps to understand what might be causing the problem. There are several common reasons an SD card won’t show photos on a Mac:
Your SD card was not mounted successfully after insertion. You may have hidden your external drives in Finder. Your SD card file system may be damaged or is just incompatible with macOS, for instance, NTFS. You simply forgot that you uploaded the photos into a subfolder in your DCIM. The problem may arise because of a faulty card reader or a faulty USB cable used to connect the device to your Mac.
None of these problems imply that your photos are lost. They just hinder their detection.
Solve the Problem with Basic Steps
As far as the easiest solution solves the problem in 50% of cases, start with basic actions:
Unplug your SD card, wait for a minute and plug it in again. Swap your card reader with another device. Try a different USB cable to connect your SD card. Restart your Mac while your device remains connected. Try your SD card on other devices (on Windows PC, camera, another Mac, etc.).
By the way, if you experience difficulties with connecting the SD card to your computer in the first place, we recommend you to take a look at this article and check the solutions proposed in it.
Adjust Finder Settings
In case your Finder does not recognize the SD card although it’s properly mounted, change Finder settings:
Click Finder in the Dock. Go to Finder → Preferences. Navigate to the General tab. Check if External disks are ticked in the list of items that will be displayed on your desktop. Switch to the Sidebar tab and check if external disks are enabled there too.
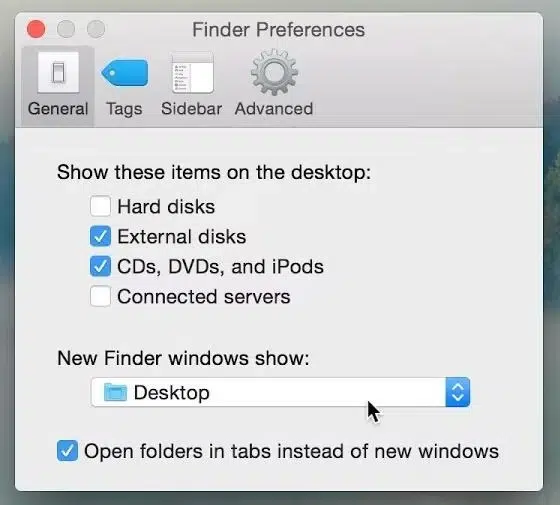
After applying the above steps, check whether your SD card now appears in the Finder sidebar. The setting is responsible for many ‘my SD card isn’t showing’ complaints.
Use Disk Utility to Mount or Repair the Card
If the above-mentioned solutions didn’t help you, try running Disk Utility to either mount your card again or fix possible file system errors:
Click Command + Space to launch Spotlight Search. Type ‘Disk Utility’ there and click Enter. On the left side of the window, find your SD card. If it is listed there but appears grey, it implies that your Mac recognizes the SD card, but failed to mount it. Click on it and press Mount. If it is healthy and does not require any fixing, click on your SD card and choose First Aid.
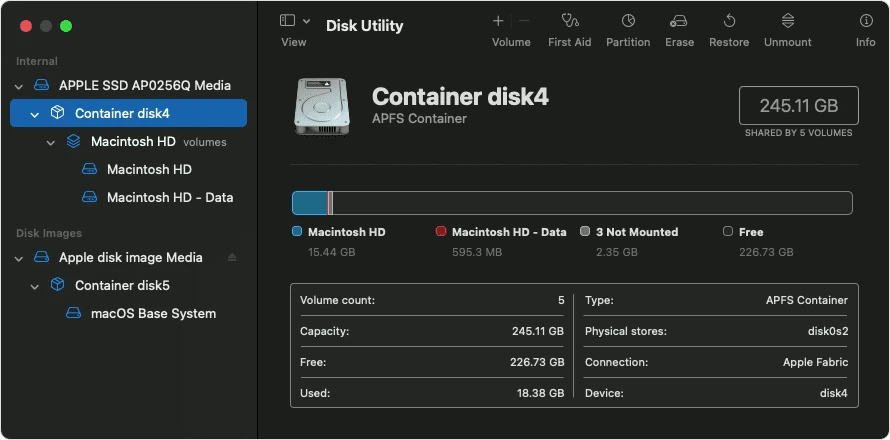
Disk Utility checks and repairs your file system in seconds.
Search in a Subfolder
Sometimes, your photos are actually on your card. However, your Finder fails to display them. As a rule, cameras store images in subfolders named according to camera brand (e.g., 100CANON).
To find your photos, navigate to such a folder in Finder.
Another tip is to look for hidden files on your SD card. Press and hold Cmd + Shift together with a period (.) to turn on hiding of such files in Finder.
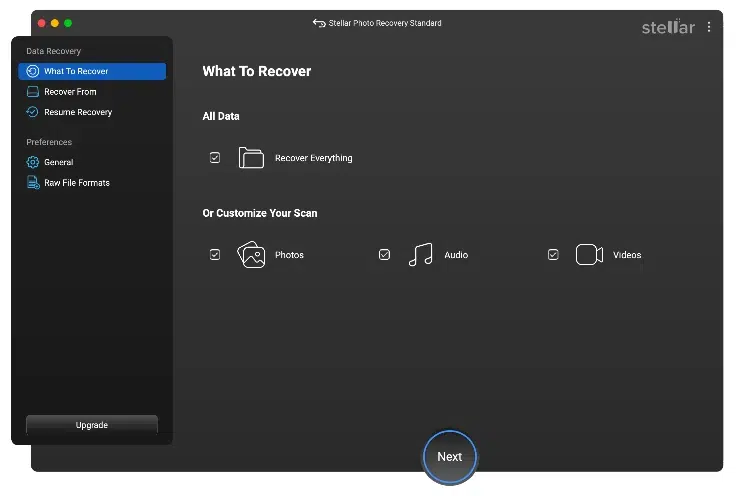
Recover Your Photos with Stellar Photo Recovery
If none of the above steps worked, it’s time to use a dedicated Mac photo recovery tool — and Stellar Photo Recovery is one of the most reliable options available.
One of the best apps of the kind is Stellar Photo Recovery – a tool designed specifically for recovery of pictures from all kinds of drives and storage media, including SD cards.
This app offers you three main benefits:
It conducts a deep scan of your hard drive, looking for the lost photos. That means that even your deleted photos or those photos that disappeared due to file system damage will be found and recovered. It supports more than 1,000 file formats, which allows it to detect and restore photos from professional cameras as well as ordinary ones. It features a quick preview function, allowing users to select only necessary files before saving.
Now, let’s discuss how to recover lost pictures from your SD card using Stellar Photo Recovery.
Steps to follow are as follows:
- Go to the official website of the app and download a trial version for your Mac.
- Run the software on your computer and choose the file type to scan.
- Select the SD card as a source of data.
Choose Deep Scan mode to scan your drive for recently lost files.
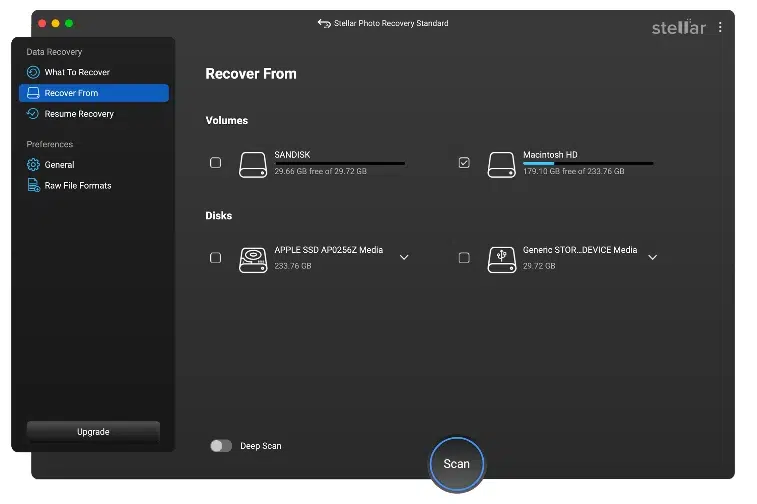
Wait till the process is over.
- Review all detected files and preview them if necessary.
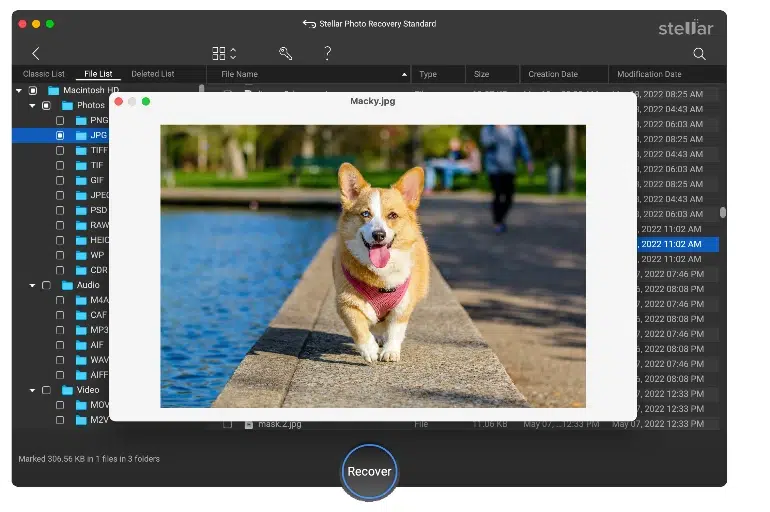
- Select the photos you want to recover and save them to another place.
Never save recovered photos back onto your SD card – you can overwrite your data.
This program is highly regarded as an efficient Mac photo recovery software. It supports all popular types of storage media and allows users to preview the photos.
Prevent the Issue Occurring in the Future
Once you have recovered your lost photos and saved them to another storage media, take precautions to avoid such problems in the future:
- Always eject your SD card properly using Finder’s eject button.
- Back up your photos regularly.
- Format your SD card only with your camera and never do that on your computer.
- Replace an old or faulty SD card immediately with a newer one.
SD cards are not expensive at all. The contents of your photos is priceless.
Conclusion
In most cases, the problem with SD cards being not recognized by Finder is caused by either a Finder setting, a problem with mounting the device or a hidden folder or file system error. Take the abovementioned steps one by one, starting with the most basic tips.
And if the worst does happen, remember that “not visible” rarely means “gone forever.” With the right Mac photo recovery software, Stellar Photo Recovery in particular, most images can be brought back even when they seem completely lost. Act quickly, stop writing to the card, and let the software do the work.
Your photos are most likely still there — you just need the right tools to find them.