If you have ever stood at your grill juggling a tray of raw kebabs in one hand, tongs in the other, and a fading phone flashlight in your mouth, you already know the truth: great grilling is not only about the grill. It is about the setup around it.
A proper station turns random outdoor cooking into a smooth routine. You stop running back and forth. You stop losing tools. You stop guessing temperatures. And you start enjoying the process.
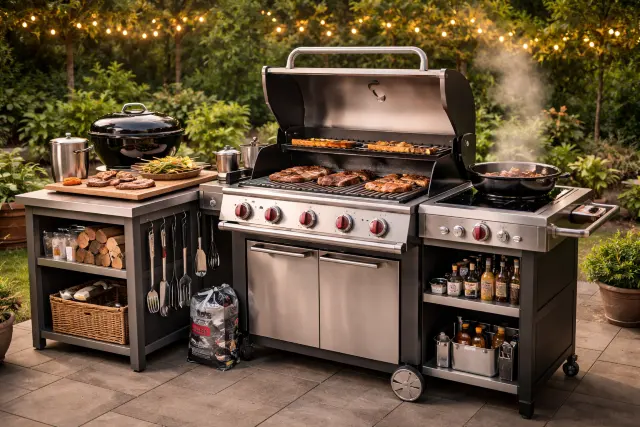
This guide is built around one core idea: Weber Grill Zubehör is most useful when it is organized into a system. Instead of collecting accessories, you build a station where every tool has a job and a home. We will walk through layout, must-have gear, safety, cleaning, and a real-world setup plan you can copy in a weekend.
What a “Weber Grilling Station” Really Means
A Weber grilling station is simply a dedicated, repeatable workspace that supports your grill the same way a kitchen counter supports your stove.
It usually includes:
- A stable base for the grill (cart, patio, island, or table)
- A prep surface (at least one)
- Tool storage
- Heat-safe landing zones for hot items
- Fuel and fire management area
- Cleaning and waste handling
- Lighting and optional smart temperature tools
The best part is that you do not need a full outdoor kitchen to get the benefits. A compact station can work beautifully if it is planned well and stocked with the right Weber Grill Zubehör.
Weber Grill Zubehör Setup Basics: Start With the “3-Zone” Layout
Before buying anything, sketch your layout. The most reliable setup is a simple three-zone flow:
Zone 1: Prep Zone (Clean Side)
This is where raw food starts and where seasoning and skewering happens.
Minimum needs:
- A small table or shelf space
- A cutting board and tray system
- Paper towels, gloves, and a trash option
Zone 2: Fire Zone (Heat Side)
This is your grill area plus the space directly around it.
Minimum needs:
- Tool hooks or tool holder
- A heat-safe tray landing spot
- Fuel access (charcoal or gas)
Zone 3: Finish Zone (Clean Side)
This is where cooked food lands and rests before serving.
Minimum needs:
- A clean tray area
- Foil, resting rack, or warming area
- Serving tools that never touch raw food
This flow reduces cross-contamination, reduces panic, and makes your station feel “bigger” than it is.
The Core Weber Grill Zubehör You Should Build Around
Accessories are easy to overbuy, so think in layers. Start with gear that supports your station and your habits, then add specialty items after you are consistently using the basics.
Weber itself organizes accessories into practical groups like grill covers, grill tools and cookware, racks and rotisseries, pizza tools, grill cleaning, fuel and smoking, and smart grilling.
Layer 1: Station and Protection (The “Always On” Gear)
1) Grill cover
A cover protects your grill and saves you cleaning time after dust, pollen, or rain. Weber lists grill covers as a dedicated accessory group, which is a good hint that protection is foundational, not optional.
2) Grill cart, side table, or prep table
Even a basic folding table changes everything. Choose something that is:
- Stable (no wobble while chopping)
- Heat-resistant near the grill edge
- Easy to wipe down
3) Storage
Hooks, bins, or a closed box keeps tools from weather and keeps your station tidy. A tidy station is faster because you stop “searching.”
Layer 2: Tools That Make Cooking Consistent
1) Tongs, spatula, and grill brush
These three are the daily drivers. Buy once, buy solid.
2) Thermometer (instant-read or probe)
If you want fewer dry chicken disasters, this is the fastest upgrade. Government food safety guidance emphasizes using a thermometer and lists safe minimum internal temperatures such as 145°F (63°C) for steaks/roasts with a 3-minute rest, 160°F (71°C) for ground meats, and 165°F (74°C) for poultry and casseroles.
A thermometer is not only about safety. It is about repeatable results, which is what a station is for.
3) Trays and pans
Have at least two trays:
- One for raw food
- One for cooked food
This small habit is a serious upgrade in cleanliness and workflow.
Layer 3: Fire Management Tools (Where the Magic Happens)
Your fuel type changes which Weber Grill Zubehör matters most.
For charcoal setups
- Chimney starter or fire starter system
- Charcoal baskets for two-zone cooking
- Ash management (ash catcher, metal bucket)
For gas setups
- Leak-check routine (soapy water test)
- Spare ignition battery if your model uses one
- Backup lighter and long matches (stored safely)
For pellet setups
- Pellet storage container that stays dry
- Cleaning brush for the burn pot area (as your manual recommends)
Safety First: Build Your Station to Prevent the Stuff Nobody Wants
Most people think grill safety is “be careful.” A better approach is design safety. Your station should make the safe choice the easy choice.
A U.S. Fire Administration report (using NFPA and NFIRS data) found an estimated 6,500 grill fires per year with about $27.6 million in property loss, and it highlights mechanical failure or malfunction as the leading ignition factor (listed at 43%).
That tells us two important things for your Weber station setup:
- Maintenance and inspection are not “extra,” they are part of the routine.
- Your layout should reduce the chance of heat meeting something flammable.
Station safety checklist that actually works
- Keep a clear perimeter around the grill (no clutter, no spare packaging, no loose towels)
- Store fuel away from the fire zone (especially charcoal bags and lighter cubes)
- Put a heat-proof landing spot next to the grill for hot grates, pans, and tools
- Keep a small fire extinguisher accessible (not hidden behind the grill)
- Avoid placing the grill where wind pushes heat directly toward walls or railings
- Make maintenance easy: keep a small inspection kit in your storage bin
This is where Weber Grill Zubehör does more than “add features.” It supports safe habits.
Pick the Right Weber Grill Zubehör for Your Grill Type
Not every accessory fits every Weber. Before you click buy, match accessories to your grill category and cooking style.
If you grill mostly burgers, steaks, and quick veg
Priorities:
- Two-zone setup tools (baskets or griddle insert depending on model)
- Quality tongs and spatula
- Instant-read thermometer
- A strong cleaning kit
If you love low and slow, ribs, brisket vibes
Priorities:
- Charcoal management tools (charcoal, vents, water pan accessories depending on grill)
- Smoking tools and wood additions
- A probe thermometer system so you are not constantly lifting the lid
Weber groups items like smoking tools and fuel accessories in a dedicated “Fuel and Smoking” category, which is a good sign that serious smoke cooking benefits from purpose-built gear.
If you cook for guests often
Priorities:
- Bigger prep surface
- More trays, more utensils, more gloves
- Lighting
- A warming or resting area
Hosting is where a station pays off the most because you stay present instead of running inside every five minutes.
The Ultimate Weber Grilling Station Blueprint (Copy This)
Here is a practical layout that works for small patios and bigger yards alike.
Step 1: Place your grill first
Put the grill where it is protected from heavy wind but has good airflow. Leave enough space to open the lid fully without hitting a wall or railing.
Step 2: Add a prep surface on your dominant-hand side
If you are right-handed, a prep surface to the right feels natural. If you are left-handed, reverse it.
Step 3: Create a “hot lane”
A hot lane is a heat-safe strip right next to the grill where hot items go. Examples:
- Cast iron pan
- Hot grill grate
- Skillet with sizzling onions
Use a heat-resistant mat or metal tray in that lane.
Step 4: Build storage below or beside the prep surface
Your storage should hold:
- Tools
- Thermometers
- Cleaning supplies
- Foil, trays, gloves
- Small bin for spices
Weber also highlights grill cleaning as a major accessory group (brushes, scrapers, cleaners, drip pans), which aligns with how important a clean, well-maintained station is.
Step 5: Add lighting and serving flow
A simple LED grill light or nearby outdoor light is enough. Your finish zone should be the clean side where serving happens.
A Practical Weber Grill Zubehör Shopping List by Budget Tier
You can build an excellent station in phases. Here is how to think about purchases without wasting money.
Phase 1: The “Weekend Fix” (Most Impact, Least Fuss)
- Cover
- Tongs, spatula
- Grill brush and scraper kit
- Instant-read thermometer
- Two trays (raw and cooked)
- Heat-safe mat or tray for hot lane
Phase 2: The “Cook Like a Pro” Upgrade
- Probe thermometer system
- Charcoal baskets or equivalent for two-zone cooking
- Rotisserie or rack system if you actually cook roasts and chicken often
- Better storage: hooks, bins, weatherproof container
Phase 3: Specialty and Fun
- Pizza tools or griddle insert
- Extra cookware (baskets, pans)
- Smoke tools and wood options
- Dedicated cutting board set for outdoor use
The trick is simple: buy Weber Grill Zubehör based on repeat use, not based on the coolest product photo.
The “Clean as You Go” Routine That Keeps Your Station Feeling New
A station feels premium when it stays clean with minimal effort.
Here is a simple routine:
Before grilling (2 minutes)
- Wipe prep surface
- Set out trays and utensils
- Confirm thermometer battery (if needed)
- Check fuel and ventilation
During grilling
- Keep a small trash bowl for scraps
- Put used tools in one designated “dirty tool” spot
- Use your hot lane for anything heat-related
After grilling (5 to 10 minutes)
- Brush grates while warm (easier cleanup)
- Empty ash or grease drip safely after it cools
- Wipe surfaces and return tools to storage
- Cover the grill once it is fully cool
This is where Weber Grill Zubehör like cleaning tools and drip pans becomes a time-saver, not just an add-on.
Common Questions People Ask When Setting Up Weber Grill Zubehör
What is the single best accessory for better results?
A reliable thermometer. Cooking to safe internal temperatures is also the clearest path to consistent doneness. FoodSafety.gov provides a clear chart for common meats, including 145°F for steaks/roasts with rest time, 160°F for ground meats, and 165°F for poultry.
How do I stop running back and forth to the kitchen?
Treat your station like a mini kitchen:
- Prep zone: seasonings, oil, gloves, tray
- Fire zone: tools and fuel
- Finish zone: clean tray, serving utensils
Once you set this up, you naturally stay outside more.
Do I need “smart grilling” accessories?
Only if they match your style. If you cook thick steaks, whole chickens, roasts, or smoke often, probes are genuinely useful. If you mostly do quick cooks, an instant-read thermometer might be enough. Weber lists “Smart Grilling” as a full accessory category, which shows it is a supported path, not just a gimmick.
How can I make my setup safer?
Design beats willpower. Grill fires are often tied to mechanical failure or malfunction and issues like maintenance and operational deficiencies. Keep your station uncluttered, do basic checks, and store flammables away from the heat zone.
A Simple Station Table You Can Use While Planning
| Station Element | What It Solves | Best Weber Grill Zubehör to Support It |
|---|---|---|
| Prep surface | Messy seasoning and chopping | Outdoor cutting board, trays, gloves |
| Tool storage | Lost tongs, clutter | Hooks, bins, tool holder |
| Hot lane | Unsafe placement of hot items | Heat mat, metal tray, grill gloves |
| Temperature control | Dry meat, undercooking | Instant-read thermometer, probe system |
| Fuel management | Uneven heat, frustration | Chimney starter, baskets, smoking tools |
| Cleaning setup | Grease buildup, bad flavors | Brush, scraper, cleaners, drip pans |
Plan the station first, then select Weber Grill Zubehör that fills the gaps.
Conclusion: Build a System, Not a Pile of Accessories
The ultimate Weber grilling station is not the biggest one. It is the one that matches how you cook, keeps you safe, and makes the process feel easy. Once your prep zone, fire zone, and finish zone are in place, every accessory starts to make sense.
Invest in Weber Grill Zubehör that improves workflow: protection, storage, temperature control, and cleaning. Add specialty gear later, once you know you will use it. Your future self will thank you the next time you grill for friends and you are calmly flipping burgers instead of sprinting for foil.
Grilling is basically controlled dry heat, and a good station helps you control it better, with less stress and better results.