If you’ve ever had blood drawn for routine tests, there’s a good chance your sample ended up in a serum separator tube. It looks simple from the outside, but inside it’s doing a very specific job: helping the lab get clean, stable serum fast, with fewer handling steps and fewer chances for mix ups. In modern diagnostics, that matters more than most people realize because many lab issues don’t happen in the machine, they happen before the sample even reaches it. In fact, studies and reviews commonly report that the preanalytical phase accounts for the majority of lab process errors, often cited around the 60 percent to 70 percent range.
Let’s break down what a serum separator tube is, how it works, and why it’s a staple in labs worldwide.
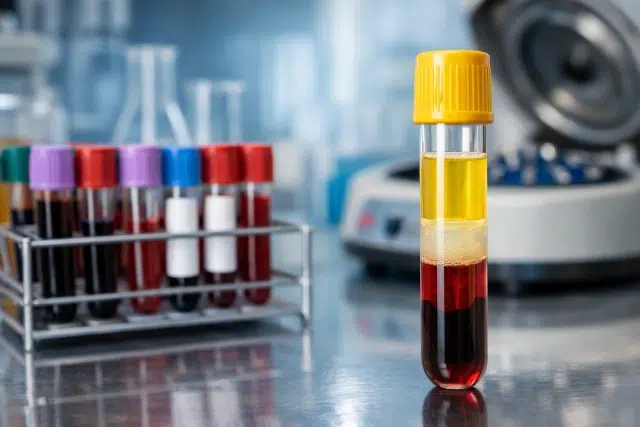
What is a serum separator tube?
A serum separator tube (often called SST) is a blood collection tube designed to produce serum for testing. It typically contains:
- A clot activator to speed up clot formation
- A gel separator that forms a physical barrier between serum and blood cells after centrifugation
That barrier is the whole point. Once blood cells are separated from serum, the sample becomes more stable during transport and storage because the cells are no longer sitting in contact with the liquid portion where many analytes are measured. The goal is straightforward: cleaner serum, fewer interferences, and more consistent results.
You’ll often see serum separator tubes identified by a gold top or tiger top cap in many collection systems (cap colors can vary by manufacturer and region, but these are common).
Why labs care so much about separation and stability
When serum stays in contact with cells too long, cells keep doing what cells do: metabolizing, releasing intracellular contents, and altering the chemistry of the sample. Delays and handling mistakes can push a sample toward rejection, recollection, or worse, a result that looks believable but is subtly off.
This isn’t a small problem. A systematic review in a major journal found an overall blood specimen rejection rate around 1.99% across studies, with clotted specimens, hemolysis, insufficient volume, and labeling errors among the major causes.
And among rejection reasons, hemolysis is repeatedly described as a leading cause, sometimes accounting for a wide share of rejected specimens depending on setting and definition.
A serum separator tube doesn’t prevent every preanalytical problem, but it reduces handling steps and helps stabilize the separated serum once processed correctly, which is a big deal for workflow and quality.
What’s inside an SST and what each part does
1) Clot activator
Serum is what you get after blood clots and the clot is removed from the liquid portion. To make this faster and more reliable, many serum separator tubes include a clot activator (often silica based). This helps the blood form a clot within the tube so the serum can be separated by centrifugation.
2) Separation gel (the barrier)
The gel is the clever part. It’s engineered to end up between the clot/cells and the serum after spinning. Manufacturers describe the separator gel as a polymer material whose behavior under centrifugation allows it to move and then settle into a stable barrier based on density differences, and many gels are described as thixotropic, meaning their viscosity changes under stress such as spinning.
In plain language: when you spin the tube, the gel temporarily moves like a thicker liquid, then it “parks” itself at the right layer and firms back up. That leaves serum above the gel and cells/clot below it.
How a serum separator tube works step by step
Step 1: Blood collection into the tube
The tube fills to a designed volume (vacuum draw systems are built for this). Proper fill matters because the ratio of additives to blood is set for a reason.
Step 2: Clotting time
Here’s where a lot of people accidentally rush. The blood needs time to clot before centrifugation.
Many lab procedures recommend allowing the sample to clot at room temperature for roughly 30 minutes to 60 minutes before spinning, depending on local protocol and tube type.
Spinning too early can leave fibrin strands or microclots that later interfere with testing or clog analyzer probes.
Step 3: Centrifugation
Centrifugation separates components by density. During this step:
- Cells and the clot pack down at the bottom
- Serum rises to the top
- The gel migrates to the interface and forms a barrier
Step 4: Post spin stability
Once the barrier is formed, serum is physically separated from cells. That’s why SSTs are popular for routine chemistry and many immunoassays: they reduce the need for manual serum transfer in many workflows, lowering contamination risk and saving time.
Why labs use serum separator tubes
1) Faster workflow and fewer handling steps
When a tube can separate and “lock” serum away from cells, the lab can often move directly to analysis without pouring off serum into a secondary tube. Fewer transfers usually mean fewer labeling mix ups and fewer exposure risks.
2) More consistent sample quality
By limiting prolonged contact between serum and cells after processing, SSTs help reduce changes in analyte concentrations caused by cellular metabolism or leakage.
3) Better transport and storage practicality
Once serum is separated, it’s generally easier to transport with lower risk of remixing. The gel barrier is specifically intended to prevent the serum from remixing with cells during handling.
4) Reducing avoidable errors
Preanalytical issues are a major contributor to lab process problems, and anything that simplifies correct processing can help reduce risk in real world settings.
Common tests that use serum from an SST
A serum separator tube is widely used for routine and specialty testing where serum is the required specimen type. Common examples include:
- Comprehensive metabolic panel (CMP) and basic metabolic panel (BMP)
- Liver function tests (LFTs)
- Lipid profile
- Thyroid tests (many assays use serum, depending on platform)
- Many hormone and immunology assays
- Serology tests (depending on the test and lab method)
Important note: some tests have strict specimen requirements and may not be appropriate for SST serum, especially if a method is sensitive to gel components or needs plasma or special anticoagulants. Labs follow their analyzer and test kit instructions for that reason.
Serum separator tube vs other common blood tubes
Here’s a quick comparison to make the differences clear.
| Tube type | What you get | Key additive | Typical use case |
|---|---|---|---|
| Serum separator tube (SST) | Serum | Clot activator + gel | Chemistry, immunoassay panels |
| Plain serum tube (red top, no gel) | Serum | None or clot activator only | When gel is not preferred, special chemistry needs |
| EDTA tube (lavender) | Plasma or whole blood | EDTA anticoagulant | CBC and hematology |
| Heparin plasma separator tube (PST) | Plasma | Heparin + gel | Many chemistry tests using plasma workflows |
This table is general and tube cap colors can vary, but it helps explain why SSTs exist: serum, separated cleanly, in a single primary tube.
The biggest mistakes with SSTs (and how to avoid them)
Mistake 1: Centrifuging before the clot fully forms
If you spin too early, you can get fibrin strands and microclots. These can cause analyzer problems and sometimes lead to redraws.
What to do instead:
- Follow your lab’s clot time policy
- As a general reference, allow adequate clotting time commonly described around 30 to 60 minutes before centrifugation in many procedures
Mistake 2: Rough handling and hemolysis
Hemolysis is often discussed as a top driver of rejection and repeat collections, and published sources note very wide ranges for its contribution depending on setting and definitions.
Practical ways to reduce hemolysis risk:
- Use the correct needle gauge and avoid forcing blood through a small needle
- Let alcohol dry before puncture
- Avoid excessive suction when using a syringe
- Mix tubes gently when required, not violently
Mistake 3: Underfilling or overfilling
Collection systems are designed for a target volume. Incorrect fill can affect additive ratio and may impact sample quality.
Mistake 4: Delayed centrifugation
Delays can affect analytes. Some lab procedures explicitly caution that delay in centrifugation can negatively affect sample quality and accuracy.
Mistake 5: Incorrect storage temperature or transport conditions
Even when serum is separated, storage conditions still matter. Different analytes have different stability windows. Labs usually follow assay specific guidance and internal SOPs.
Real world scenario: why one extra step can change a patient’s day
Imagine an emergency department draw where the sample is hemolyzed. The result might be rejected or flagged, and the patient needs another draw. That adds time, discomfort, and can delay decisions. In some settings, hemolysis rates can be especially high, and published clinical lab medicine literature notes that hemolysis can drive repeat collections and delays in turnaround time.
Now flip the scenario: proper collection technique, correct clot time, correct spin, and the serum separator tube does its job. The lab gets a clean specimen, the analyzer runs smoothly, and the clinician gets actionable results faster.
That’s why labs care about these tubes. They’re not just plastic. They’re a workflow tool.
Best practice checklist for serum separator tube handling
Use this as a practical reminder for consistent results:
- Verify patient ID and label immediately at bedside
- Fill the tube to the intended volume
- Allow adequate clotting time before centrifugation
- Centrifuge according to your lab’s protocol and tube manufacturer guidance
- Confirm the gel barrier formed properly after spinning
- Store and transport as required by the test menu and SOPs
- Document issues like hemolysis, clots, or short draw when observed
FAQs about serum separator tubes
What is serum, and why not just test whole blood?
Serum is the liquid portion of blood after clotting, without clotting factors and cells. Many chemistry and immunoassay methods are validated on serum because it provides a cleaner matrix compared to whole blood, which contains cells that can interfere with measurement.
Can an SST be used for every blood test?
No. Some tests require plasma with a specific anticoagulant, whole blood, or special handling. Some methods can also be sensitive to gel separator components. Labs choose tubes based on the test requirements and instrument validation.
Why does clot time matter so much?
If the sample hasn’t clotted fully, you can get fibrin strands or partial clots that cause instrument errors or unreliable results. Many procedures reference a clotting window around 30 to 60 minutes before spinning for serum tubes.
How does the gel know where to go?
It’s engineered with a density that allows it to settle between serum and the packed cell layer during centrifugation. Manufacturers describe gel as forming a stable barrier after spinning and returning to a semi solid state when the centrifuge stops.
Conclusion
A serum separator tube is one of those behind the scenes lab essentials that quietly supports accurate diagnostics every day. By combining a clot activator with a gel barrier, it helps labs produce cleaner serum with fewer manual steps, better stability, and smoother workflows. In a world where preanalytical issues account for a major share of lab process errors, using the right tube and processing it correctly is not a minor detail, it’s part of patient safety and reliable decision making.
Near the end of the process, it comes back to basics: correct collection, adequate clotting, correct centrifugation, and thoughtful handling. Do that well, and the serum separator tube delivers exactly what it was designed for: high quality serum that clinicians can trust.
When you understand how it protects the serum from cellular interference, you also understand why labs rely on it for routine chemistry and immunoassays that impact everyday care. If you only remember one thing, remember this: the tube is part of the test, and the better you treat the sample, the better the result. Learn more about blood serum in simple terms.