If you have ever tried to run a new pipe or conduit through a finished wall, you already know the stress: one wrong move and the surface chips, the plaster spider cracks, or the concrete edge blows out. That is exactly why so many contractors rely on the Core Cutter Method when they need clean, round penetrations for plumbing and electrical work. Done properly, the Core Cutter Method removes material with a controlled cutting action instead of pounding the wall with impact, which is the usual culprit behind cracks, spalling, and ugly patch jobs.
In this guide, I will walk you through how the Core Cutter Method works, when to use it, the tools you actually need, and the habits that keep walls intact while still getting the hole you came for.
What the Core Cutter Method actually is
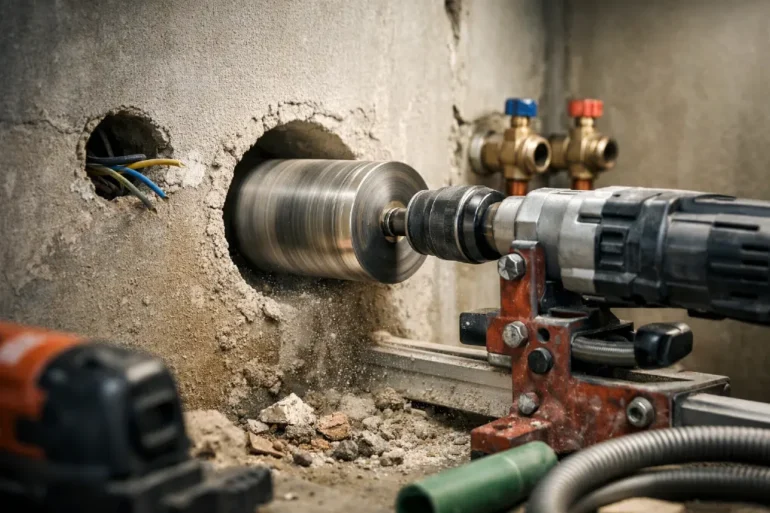
The Core Cutter Method is a way of drilling circular openings by cutting a ring through the material and extracting a cylindrical “core” from the center. In practice, that usually means a diamond core bit and a rotary core drill, often mounted on a stand for stability.
The key difference is the cutting style. Unlike hammer drilling, which fractures the wall using repeated impact, the Core Cutter Method grinds and cuts. That matters for plumbing sleeves, electrical conduit, AC lines, exhaust ducts, and anywhere you want a neat opening that looks intentional.
Why it helps prevent cracks
Cracking is rarely “bad luck.” It is usually one of these:
- Too much vibration from impact drilling
- Drilling too close to an edge or corner
- Poor pilot control that makes the bit walk and chew the face
- Heat buildup that damages the bit and forces you to push harder
- Hidden reinforcement or embedded conduit getting struck mid-cut
Because the Core Cutter Method is low-impact, it reduces vibration and surface shock compared to percussion drilling, which is commonly associated with cracking or spalling in masonry and older concrete.
Best use cases for plumbing and electrical work
You do not need the Core Cutter Method for every hole. A small anchor hole for a clip is usually fine with a rotary hammer. But for service penetrations, it is often the cleanest option.
Here are common scenarios where the Core Cutter Method shines:
Plumbing
- 25 to 75 mm pipe penetrations through block or concrete
- Floor drain and waste line pass-throughs
- Water supply lines through exterior masonry
- Sleeves for PEX manifolds or multi-line runs
- Core holes for vent stacks (especially where finish quality matters)
Electrical
- Conduit passes through masonry or concrete walls
- Main feeder conduit penetration
- Penetrations for outdoor lighting wiring to pass through exterior walls
- Data cables in commercial concrete partitions
- Electrical sleeves through beams or slabs (where allowed)
If you are cutting a hole larger than roughly 50 mm, or you need a clean edge for a sleeve, the Core Cutter Method typically saves time overall because you patch less and fight the hole less.
Tools and materials you will want on site
You can do the Core Cutter Method with different budgets, but the basics stay the same. This list focuses on what actually impacts results.
Core drilling setup
- Core drill motor (handheld or rig-mounted)
- Diamond core bit (choose by diameter and material)
- Stand or rig (highly recommended for clean holes, especially in walls)
- Water feed for wet coring or a vacuum system for dry coring
- Anchor or vacuum base to secure the rig (depending on surface)
Some professional core drills include low-vibration, low-speed starting modes to help you begin the cut without bit wander, which directly reduces face damage.
Must-have accessories
- Level (small torpedo level is fine)
- Measuring tape, marker, and a center punch
- Catch tray or water ring (wet coring)
- Wet vacuum (slurry cleanup)
- Dust extraction vacuum with proper filter (dry coring)
- PPE: eye protection, hearing protection, gloves, respirator where needed
A quick bit selection table
| Wall material | Recommended coring style | Bit type | Notes |
|---|---|---|---|
| Reinforced concrete | Wet coring preferred | Diamond core bit | Cooler cut, longer bit life |
| Concrete block (CMU) | Wet or dry | Diamond core bit | Watch hollow cells, reduce push |
| Brick masonry | Usually dry OK | Diamond core bit | Avoid edge drilling near mortar joints |
| Tile over masonry | Dry start then wet if possible | Diamond core bit | Protect tile face from chipping |
| Stone | Wet coring | Diamond core bit | Slow start, keep water consistent |
Safety matters more than people think
Most “quick holes” create the biggest safety problems, especially in enclosed indoor work.
Dust and silica: do not treat it like normal dust
Concrete, brick, and many masonry products contain crystalline silica. Cutting or drilling can release respirable crystalline silica, which is linked to silicosis, lung cancer, COPD, and kidney disease.
For construction work, OSHA’s respirable crystalline silica standard sets a permissible exposure limit (PEL) of 50 μg/m³ as an 8-hour time-weighted average, and an action level of 25 μg/m³.
Practical takeaway: choose dust control on purpose, not as an afterthought.
Wet coring vs dry coring for safety
- Wet coring can dramatically reduce airborne dust, but it creates slurry that must be contained and cleaned.
- Dry coring avoids water mess but demands serious dust extraction and the right bit for the job.
NIOSH also emphasizes controlling silica dust through engineering controls, which is exactly why wet methods and effective local extraction are such a big deal.
Step-by-step: Core Cutter Method without cracking the wall
This is the workflow that keeps holes clean and walls intact.
1) Confirm what is inside the wall before you drill
Before the Core Cutter Method starts, the best crack prevention move is simply not hitting the wrong thing.
- Check drawings if you have them
- Use a stud finder for framed walls
- For concrete slabs and walls, scanning for rebar, embedded conduits, or post-tension cables is a common professional step on real jobs
If you are working in a building where surprises are expensive, this is not optional.
2) Mark the center and the final diameter
Measure twice, mark once.
- Mark the center point
- Mark the circle outline (or at least reference points) so you can visually confirm alignment
- Double-check clearances for pipe insulation, sleeves, fire collars, or conduit couplings
A frequent mistake is drilling the exact pipe OD and then realizing you needed space for movement, sleeve thickness, or a seal.
3) Choose the right approach: handheld or rig-mounted
If you want the cleanest hole with the least risk of face damage, a rig wins.
- Rig-mounted drilling keeps the bit square and prevents wobble
- It reduces the temptation to “muscle through” the cut
- It improves consistency, especially on larger diameters
Handheld coring can work for smaller holes in forgiving material, but it is much easier to tilt, chatter, or scar the surface.
4) Secure the rig properly
Your rig is only as good as its base.
- Anchor base: very stable, but you need an anchor hole
- Vacuum base: faster setup on smooth surfaces, but requires a reliable vacuum seal and the right surface condition
If the rig shifts mid-cut, the face can chip and the bit can bind.
5) Start slow and let the bit “seat”
This is where most wall damage starts.
- Begin at low speed
- Apply light, steady pressure
- Let the bit create a shallow groove before increasing feed
Many modern rigs include features designed to help start holes with less vibration, which reduces surface breakout.
6) Control heat and friction
Heat makes you push harder. Pushing harder increases vibration and damage. It is a cycle you do not want.
For wet coring:
- Keep water flow steady, not flooding
- Watch slurry color. If it is thick and dark, you may be running too hot or too dry
For dry coring:
- Use proper dust extraction
- Use the bit rated for dry cutting
- Pause briefly if you smell overheating
7) Manage breakthrough so the exit side does not blow out
Even with the Core Cutter Method, the exit side can spall if you rush the last part.
- Reduce feed pressure as you near breakthrough
- If you can access both sides, consider coring halfway from each side to meet in the middle for perfect edges
- For finished interior walls, a backing board or temporary support on the exit side can help reduce chipping
8) Extract the core safely and clean the opening
Once you are through:
- Stop the drill before removing it
- Remove the core carefully
- Clean the opening edges
- Check that the sleeve or conduit fits without forcing it
For plumbing, a clean opening means seals sit properly and you do not end up grinding the hole bigger later.
Wet coring or dry coring: which should you choose?
Here is the honest answer: it depends on the jobsite and the finish level.
Choose wet coring when:
- You are drilling reinforced concrete or dense material
- You can contain slurry
- Dust control is a priority indoors
- You want maximum bit life and smoother cutting
Choose dry coring when:
- Water would damage finishes, ceilings, or electrical areas
- You are drilling smaller diameters in masonry or brick
- You have strong dust extraction and the correct dry bit
If silica exposure is a concern, wet methods and proper controls are widely recommended for reducing airborne dust.
How to size holes correctly for pipes and conduit
Sizing is where DIY jobs and even some rushed installs go wrong. The Core Cutter Method makes a clean circle, but you still have to choose the diameter intelligently.
Plumbing hole sizing tips
- Add clearance for insulation and movement
- Consider sleeves in concrete, not direct pipe contact
- Plan for firestopping if it is a rated wall or slab
Electrical hole sizing tips
- Allow space for conduit couplings and pulling clearance
- Plan conduit spacing so you are not forced into awkward bends
- If multiple conduits pass through one core, check code and fire rating requirements
A simple rule that keeps you out of trouble: if the penetration is part of a system that needs sealing, firestopping, or waterproofing, size for the finished detail, not just the raw pipe.
Common mistakes that cause cracks or ugly holes
These show up again and again, even on professional sites.
- Starting too fast
The bit skates, scratches the face, and chips the surface. Start slow. - Pushing too hard
You are not drilling wood. The Core Cutter Method works best with steady pressure and a sharp bit. - Skipping alignment checks
A few degrees off can ruin your sleeve alignment inside a wall cavity. - Drilling too close to edges
Masonry and older concrete are especially vulnerable near edges and corners. - No plan for breakthrough
Exit-side blowout is the most common cosmetic failure. - Ignoring dust control
Silica hazards are real and well documented.
Real-world scenario: running an AC drain and power through an exterior wall
Let’s say you need two penetrations through an exterior masonry wall:
- One for a condensate drain line
- One for electrical conduit feeding the outdoor unit
Here is how the Core Cutter Method keeps the job clean:
- You mark both centers and check spacing so the conduit does not interfere with the drain slope
- You choose a slightly oversized core for the drain to allow insulation or a sleeve
- You rig-mount the core drill so the holes stay square and aligned
- You start slowly to avoid chipping the exterior face brick
- You reduce pressure at breakthrough to protect the inside plaster finish
- You end up with two round penetrations that need minimal patching, and sealing is straightforward
That is the hidden cost advantage: less repair work, less rework, fewer callbacks.
Quick checklist before you core a wall
Use this list on every job and you will prevent most headaches.
- Confirm pipe or conduit route and final sleeve detail
- Identify hidden services (water, electrical, rebar, post-tension where relevant)
- Choose correct diameter with clearance
- Decide wet or dry method and plan containment
- Secure rig properly and verify it is level
- Start slow, then increase speed once seated
- Control breakthrough pressure
- Clean edges and verify fit before you pack up
FAQs people actually ask on jobsites
Is the Core Cutter Method better than a hammer drill for conduit holes?
For larger conduit holes and any opening where finish quality matters, the Core Cutter Method is usually better because it cuts with far less impact vibration, which reduces the chance of cracking or spalling.
Can I use the Core Cutter Method in brick without damaging the face?
Yes, but start slow, keep the rig stable, and be extra cautious near mortar joints. Many brick faces chip because the bit was allowed to walk during the first few seconds.
Do I need water every time?
Not every time. Wet coring is excellent for dense concrete and dust control, while dry coring can be practical in certain masonry jobs if you have proper dust extraction and the right bit.
What is the biggest safety issue with coring indoors?
Respirable crystalline silica is one of the biggest concerns when cutting or drilling concrete and masonry, and OSHA provides strict exposure requirements for construction work.
Conclusion
If your goal is a clean penetration for plumbing or electrical work, with the least risk of cracking walls or making a mess, the Core Cutter Method is one of the most reliable approaches. It trades impact for controlled cutting, which helps protect finished surfaces and reduces ugly breakout. Combine the Core Cutter Method with the right bit, a stable rig, smart breakthrough control, and serious dust management, and you will get holes that fit sleeves perfectly and seal cleanly.
In the last step, treat the opening like a detail, not just a hole. Seal it properly, respect fire ratings where required, and document the location for future maintenance. If you want a deeper technical background on diamond drilling, it helps explain why the cutting action is so much gentler on surrounding material than impact-based methods.